The majority of the information and recipes on this page are mainly what I have found on the Net and where I have the orginal link I will give it - I don't mean to plagiarise anyone else's work. The cooking recipes can also be as a result of my own trial and error.
I've been looking for ways to reduce our dependence on chemical cleaning aids and have come across the following:
I've been looking for ways to reduce our dependence on chemical cleaning aids and have come across the following:
Homemade Laundry Soap
1 large bar of pure soap (e.g. Sunlight)
1 cup of washing soda
1 cup of borax
Grater
Airtight container
Grate the soap bar on the fine side. Mix 2 cups of it with the borax and washing soda. Store in an airtight container. Use 2 tablespoons per laundry load.
Liquid laundry soap
1 large bar pure soap (grated)
½ cup borax
½ cup washing soda
6 cups of water
A large bucket with a lid (this will be your storage container)
Put two cups of soap into a large saucepan. Add the water and heat gently until the soap has melted. Add the borax and washing soda and stir until it is all dissolved. Remove from the heat.
In your bucket add 4 cups if hot water then your soap mixture and stir it until mixed. Add another 1 gallon (4 lts or 16 cups) of water to the bucket and stir. Let the soap stand for 24 hrs when it will become gel like.
You can add ½ cup to each full load of laundry in a small machine and 1 cup in a large machine.
Green fabric softener?
Simply add ½ cup baking soda OR vinegar to your rinse cycle for soft laundry - a few drops of your favourite essential oil made also be added to the vinegar.
How to Make Your Own Dish Washing Liquid Soap
1/4 cup soap flakes
2 cups hot water
1/4 cup glycerin
1/2 teaspoon of any desired scented essential oil
1 In a mixing bowl, combine the soap flakes and the hot water together. It is important the water is hot, otherwise the soap flakes will not melt, rather they may clump up together.
1 In a mixing bowl, combine the soap flakes and the hot water together. It is important the water is hot, otherwise the soap flakes will not melt, rather they may clump up together.
2 Mix well until the soap flakes are all dissolved. Allow the mixture to cool to luke warm before continuing.
3 Next you want to stir in both the glycerin and the essential oil, allow it to cool completely.
4 As it cools you will notice it become a gel like substance. You will want to break the gel down by stirring it with a fork and placing it into a bottle you choose. An old liquid dish soap bottle, shampoo, or conditioner bottle would be a great choice. Use it as you would any other dish washing soap.
TO CLEAN BATHS and BASINS
Sprinkle some baking soda onto the surface and rub with a wet cloth. Be careful on delicate surfaces - test it out first to make sure it won’t scratch. To shine the surface afterward, you can spray a bit of vinegar and wipe clean.
TO CLEAN SHOWER CUBICLES
Mix 1/2 cup bicarbonate of soda with enough vinegar to form a paste and apply to walls, grouting and floor areas of shower to remove scum / soap build up
TO CLEAN SHOWER CUBICLES
Mix 1/2 cup bicarbonate of soda with enough vinegar to form a paste and apply to walls, grouting and floor areas of shower to remove scum / soap build up
TO UNBLOCK SHOWER /BASIN DRAINS
Place enough baking soda (1/4 - 1/2 cup)into the drain and then gently pour in some vinegar - watch it bubble the muck straight out of your drainpipe. Rinse out with hot water.
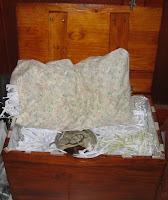
HOW TO COOK WITH A HOT BOX
I took my grown up son’s old wooden pine toy box, gave it a good sanding and coated it with a low VOC varnish. In place of sending the scrap paper / newspaper to recycling one week I shoved it all through the shredding machine. I lined the box with a thick layer of that shredded paper(I’m constantly adding a little more to it every time I use it, as the shredded paper compresses with use), filling an old unmatched pillowcase at the same time to act as a lid. I place the pot of food into a well in the centre of the box / paper and cover with the ‘lid’ and let the box / shredded paper take over as my stove. It really works a treat.
These are some of the meals I produced from the old toy box:
Spaghetti Bolognaise sauce:
I brown one onion then add the mince (beef / ostrich or chicken- makes no difference). When that is slightly browned I add a dose of mixed herbs, crushed garlic, a beef / chicken stock cube and a tin of whole peeled tomatoes (chopped up) or 6 – 8 fresh tomatoes chopped small. I rinse out the tin by filling it 1/3rd with water and add that to the pot. And no other liquid. I put the lid on bring the whole lot to the boil on the stove top for 10 – 15 minutes and then pop it into the box. At the end of the day the pot is still boiling hot and the meal is cooked. I return it to the stove bringing it back to the boil briefly and check if it needs salt and pepper. Switch off and keep warm on the stove top whilst I make the pasta, grated some sprinkling cheese and done – dinner is served!
Chicken stew (using whole chicken pieces) beef stew (chopped beef cubes) – they’re made in exactly the same way. Even dried peas / rice / lentils – no problem. I try and soak the latter overnight, prior to rinsing and bringing to the boil, but they can be cooked without soaking – just give them 5 extra minutes on the stove top.
I have left all of the above in the box cooker all day finishing the meal in the evening – it can’t ‘boil’ dry or spoil, as it is slow cooking.
The secret is the 10 – 15 minutes boiling beforehand and a well insulated layer of shredded paper. But I always bring the pot back to the boil briefly afterwards. And please be aware that you don’t need masses of liquid – let the chicken / beef / ostrich produce its’ own gravy which isn’t going to evaporate on your stove top.
MAKING BREAD WITHOUT YEAST
by S. John Ross
Sourdough bread is bread made without added yeast. By making a "starter" in which wild yeast can grow, the sourdough baker can raise bread naturally, as mankind did for thousands and thousands of years before a packet of yeast was an available convenience at the local market.
To become a sourdough baker, all you need are some basic ingredients (flour, water, salt, and sugar), some basic tools (a mixing bowl, an oven, and a baking sheet), and a basic interest. This page is for the novice sourdough baker, but assumes that the reader is familiar with regular yeast-based baking. If you can make bread, you can make sourdough bread.
There are only a few simple steps to becoming a sourdough baker. First, you must create a starter: This is a bubbly batter that you keep in your fridge. The starter is mixed into a dough, and it causes the bread to rise.
Creating Your Starter
The novel thing about sourdough baking is that it requires that you keep something alive in your fridge. Sourdough "starter" is a batter of flour and water, filled with living yeast and bacteria. The yeast and bacteria form a stable symbiotic relationship, and (as long as you keep the starter fed) can live for centuries, a thriving colony of microorganisms. To make sourdough bread, you blend the starter with some flour and make dough. The yeast propagates, and leavens your bread. This is how you make your starter:
Select a container that your "pet" will live in. A wide-mouthed glass jar is best. I use a glass jar with a rubber and wireframe seal; you can find these in the local supermarket. You can also use a Tupperware container. A wide-mouthed mayonnaise or pickle jar will also do just fine. Metallic containers are a bad idea; some of them are reactive and can ruin your starter (for the same reason, avoid using metal utensils to stir your starter).
Blend a cup of warm water and a cup of flour, and pour it into the jar. That's the whole recipe! I use plain, unbleached bread flour most of the time, but I've had good results with all-purpose and whole-wheat flour, too.
Every 24 Hours, Feed the Starter. You should keep the starter in a warm place; 20 - 30o C is perfect. This allows the yeast already present in the flour (and in the air) to grow rapidly. Temperatures hotter than 37 o C or so will kill it. You can take comfort from the fact that almost nothing else will do so. The way you feed the starter is to (A) throw away half of it and then (B) add a half-cup of flour and a half-cup of water. Do this every 24 hours. Within three or four days (it can take longer, a week or more, and it can happen more quickly) you should start getting lots of bubbles throughout, and a pleasant sour or beery smell. The starter may start to puff up, too. This is good. Here's the gist: When your starter develops a bubbly froth, it is done. You have succeeded. If this sounds brain-dead simple, that's because it is. People who didn't believe the Earth was round did this for millenia.
Refrigerate the Starter. Keep the starter in your fridge, with a lid on it. Allow a little breathing space in the lid. If you're using a mayo or pickle jar, punch a hole in the lid with a nail, that kind of thing. Once the starter is chilled, it needs to be fed only once a week. Realistically, you can get away with less; it's important to remember that your starter is a colony of life-forms that are almost impossible to kill (except with extreme heat). Even starving them is difficult.
Care and Feeding: Hooch
Aside from weekly feeding, the only other thing you need to worry about is hooch. Hooch is a layer of watery liquid (often dark) that contains alchohol. It smells a bit like beer, because it is a bit like beer - but don't drink it! Hooch builds up in your starter, especially in the fridge. Just pour it off or stir it back in. It doesn't hurt anything. If your starter is looking dry, stir it back in. If your starter is plenty wet, pour it off. Just remember that hooch is nothing to worry about!
Sourdough Baking Step One: Proofing the Sponge
Several hours before you plan to make your dough (recipe below), you need to make a sponge. A "sponge" is just another word for a bowl of warm, fermented batter. This is how you make your sponge.
Take your starter out of the fridge. Pour it into a large glass or plastic bowl. Meanwhile, wash the jar and dry it. You may also wish to pour boiling water over it, since you don't want other things growing in there with your pet!
Add a cup of warm water and a cup of flour to the bowl. Stir well, and set it in a warm place for several hours. This is called "proofing," another word for fermenting.
Watch for Froth and and Sniff. When your sponge is bubbly and has a white froth, and it smells a little sour, it is ready. The longer you let the sponge sit, the more sour flavor you will get.
The proofing-time varies. Some starters can proof up to frothiness in an hour or two. Some take 6-8 hours, or even longer. Just experiment and see how long yours takes. If you're going to bake in the morning, set your sponge out to proof overnight.
Sourdough Baking Step Two: The Actual Recipe
Of course, there are a lot of recipes for sourdough bread. There are also recipes for sourdough rolls, sourdough pancakes, sourdough pretzels, sourdough bagels, and probably sourdough saltines for all I know. This is the basic recipe I use, though, and it's simple and makes a fine bread. You'll need the following:
2 Cups of sponge (proofed starter)
3 Cups of unbleached flour
2 tablespoons of olive oil or softened margarine
4 teaspoons of sugar
2 teaspoons of salt
First, let's talk about leftover sponge. You should have some. The leftover sponge is your starter for next time: Put it into the jar, and give it a fresh feed of a half-cup each of flour and warm water. Keep it in the fridge as above; you'll have starter again next time.
Now, for the recipe: To the sponge, add the sugar, salt, and oil (the oil is optional - you can use softened butter instead, or no oil at all). Mix well, then knead in the flour a half-cup at a time. Knead in enough flour to make a good, flexible bread dough. You can do this with an electric mixer, a bread machine on "dough cycle," or a food processor. You can also do it with a big bowl and your bare hands.
Keep in mind that flour amounts are approximate; flour varies in absorbency, and your sponge can vary in wetness. Use your judgement; treat it like ordinary white or french bread dough. Trust your hands and eyes more than the recipe, always.
Let the dough rise in a warm place, in a bowl covered loosely with a towel (if you're using a bread machine's dough cycle, let it rise in the machine). Note that sourdough rises more slowly than yeast bread; my starter takes about an hour or so, but some starters take much longer. Let the dough double in bulk, just like yeast-bread dough. When a finger poked into the top of the dough creates a pit that doesn't "heal" (spring back), you've got a risen dough.
Punch the dough down and knead it a little more. Make a loaf and place it on a baking sheet (lightly greased or sprinkled with cornmeal). Slit the top if you like, and cover the loaf with a paper towel and place it in a warm place to rise again, until doubled in bulk.
Place the pan with the loaf in your oven, and then turn your oven to 180o C and bake the bread for 30-45 minutes. Do not preheat the oven. The loaf is done when the crust is brown and the bottom sounds hollow when thumped with a wooden spoon. Turn the loaf out onto a cooling rack or a towel and let it cool for an hour before slicing.
HOW TO COOK WITH A HOT BOX
I took my grown up son’s old wooden pine toy box, gave it a good sanding and coated it with a low VOC varnish. In place of sending the scrap paper / newspaper to recycling one week I shoved it all through the shredding machine. I lined the box with a thick layer of that shredded paper(I’m constantly adding a little more to it every time I use it, as the shredded paper compresses with use), filling an old unmatched pillowcase at the same time to act as a lid. I place the pot of food into a well in the centre of the box / paper and cover with the ‘lid’ and let the box / shredded paper take over as my stove. It really works a treat.
These are some of the meals I produced from the old toy box:
Spaghetti Bolognaise sauce:
I brown one onion then add the mince (beef / ostrich or chicken- makes no difference). When that is slightly browned I add a dose of mixed herbs, crushed garlic, a beef / chicken stock cube and a tin of whole peeled tomatoes (chopped up) or 6 – 8 fresh tomatoes chopped small. I rinse out the tin by filling it 1/3rd with water and add that to the pot. And no other liquid. I put the lid on bring the whole lot to the boil on the stove top for 10 – 15 minutes and then pop it into the box. At the end of the day the pot is still boiling hot and the meal is cooked. I return it to the stove bringing it back to the boil briefly and check if it needs salt and pepper. Switch off and keep warm on the stove top whilst I make the pasta, grated some sprinkling cheese and done – dinner is served!

Chicken stew (using whole chicken pieces) beef stew (chopped beef cubes) – they’re made in exactly the same way. Even dried peas / rice / lentils – no problem. I try and soak the latter overnight, prior to rinsing and bringing to the boil, but they can be cooked without soaking – just give them 5 extra minutes on the stove top.
I have left all of the above in the box cooker all day finishing the meal in the evening – it can’t ‘boil’ dry or spoil, as it is slow cooking.
The secret is the 10 – 15 minutes boiling beforehand and a well insulated layer of shredded paper. But I always bring the pot back to the boil briefly afterwards. And please be aware that you don’t need masses of liquid – let the chicken / beef / ostrich produce its’ own gravy which isn’t going to evaporate on your stove top.
MAKING BREAD WITHOUT YEAST
by S. John Ross
Sourdough bread is bread made without added yeast. By making a "starter" in which wild yeast can grow, the sourdough baker can raise bread naturally, as mankind did for thousands and thousands of years before a packet of yeast was an available convenience at the local market.
To become a sourdough baker, all you need are some basic ingredients (flour, water, salt, and sugar), some basic tools (a mixing bowl, an oven, and a baking sheet), and a basic interest. This page is for the novice sourdough baker, but assumes that the reader is familiar with regular yeast-based baking. If you can make bread, you can make sourdough bread.
There are only a few simple steps to becoming a sourdough baker. First, you must create a starter: This is a bubbly batter that you keep in your fridge. The starter is mixed into a dough, and it causes the bread to rise.
Creating Your Starter
The novel thing about sourdough baking is that it requires that you keep something alive in your fridge. Sourdough "starter" is a batter of flour and water, filled with living yeast and bacteria. The yeast and bacteria form a stable symbiotic relationship, and (as long as you keep the starter fed) can live for centuries, a thriving colony of microorganisms. To make sourdough bread, you blend the starter with some flour and make dough. The yeast propagates, and leavens your bread. This is how you make your starter:
Select a container that your "pet" will live in. A wide-mouthed glass jar is best. I use a glass jar with a rubber and wireframe seal; you can find these in the local supermarket. You can also use a Tupperware container. A wide-mouthed mayonnaise or pickle jar will also do just fine. Metallic containers are a bad idea; some of them are reactive and can ruin your starter (for the same reason, avoid using metal utensils to stir your starter).
Blend a cup of warm water and a cup of flour, and pour it into the jar. That's the whole recipe! I use plain, unbleached bread flour most of the time, but I've had good results with all-purpose and whole-wheat flour, too.
Every 24 Hours, Feed the Starter. You should keep the starter in a warm place; 20 - 30o C is perfect. This allows the yeast already present in the flour (and in the air) to grow rapidly. Temperatures hotter than 37 o C or so will kill it. You can take comfort from the fact that almost nothing else will do so. The way you feed the starter is to (A) throw away half of it and then (B) add a half-cup of flour and a half-cup of water. Do this every 24 hours. Within three or four days (it can take longer, a week or more, and it can happen more quickly) you should start getting lots of bubbles throughout, and a pleasant sour or beery smell. The starter may start to puff up, too. This is good. Here's the gist: When your starter develops a bubbly froth, it is done. You have succeeded. If this sounds brain-dead simple, that's because it is. People who didn't believe the Earth was round did this for millenia.
Refrigerate the Starter. Keep the starter in your fridge, with a lid on it. Allow a little breathing space in the lid. If you're using a mayo or pickle jar, punch a hole in the lid with a nail, that kind of thing. Once the starter is chilled, it needs to be fed only once a week. Realistically, you can get away with less; it's important to remember that your starter is a colony of life-forms that are almost impossible to kill (except with extreme heat). Even starving them is difficult.
Care and Feeding: Hooch
Aside from weekly feeding, the only other thing you need to worry about is hooch. Hooch is a layer of watery liquid (often dark) that contains alchohol. It smells a bit like beer, because it is a bit like beer - but don't drink it! Hooch builds up in your starter, especially in the fridge. Just pour it off or stir it back in. It doesn't hurt anything. If your starter is looking dry, stir it back in. If your starter is plenty wet, pour it off. Just remember that hooch is nothing to worry about!
Sourdough Baking Step One: Proofing the Sponge
Several hours before you plan to make your dough (recipe below), you need to make a sponge. A "sponge" is just another word for a bowl of warm, fermented batter. This is how you make your sponge.
Take your starter out of the fridge. Pour it into a large glass or plastic bowl. Meanwhile, wash the jar and dry it. You may also wish to pour boiling water over it, since you don't want other things growing in there with your pet!
Add a cup of warm water and a cup of flour to the bowl. Stir well, and set it in a warm place for several hours. This is called "proofing," another word for fermenting.
Watch for Froth and and Sniff. When your sponge is bubbly and has a white froth, and it smells a little sour, it is ready. The longer you let the sponge sit, the more sour flavor you will get.
The proofing-time varies. Some starters can proof up to frothiness in an hour or two. Some take 6-8 hours, or even longer. Just experiment and see how long yours takes. If you're going to bake in the morning, set your sponge out to proof overnight.
Sourdough Baking Step Two: The Actual Recipe
Of course, there are a lot of recipes for sourdough bread. There are also recipes for sourdough rolls, sourdough pancakes, sourdough pretzels, sourdough bagels, and probably sourdough saltines for all I know. This is the basic recipe I use, though, and it's simple and makes a fine bread. You'll need the following:
2 Cups of sponge (proofed starter)
3 Cups of unbleached flour
2 tablespoons of olive oil or softened margarine
4 teaspoons of sugar
2 teaspoons of salt
First, let's talk about leftover sponge. You should have some. The leftover sponge is your starter for next time: Put it into the jar, and give it a fresh feed of a half-cup each of flour and warm water. Keep it in the fridge as above; you'll have starter again next time.
Now, for the recipe: To the sponge, add the sugar, salt, and oil (the oil is optional - you can use softened butter instead, or no oil at all). Mix well, then knead in the flour a half-cup at a time. Knead in enough flour to make a good, flexible bread dough. You can do this with an electric mixer, a bread machine on "dough cycle," or a food processor. You can also do it with a big bowl and your bare hands.
Keep in mind that flour amounts are approximate; flour varies in absorbency, and your sponge can vary in wetness. Use your judgement; treat it like ordinary white or french bread dough. Trust your hands and eyes more than the recipe, always.
Let the dough rise in a warm place, in a bowl covered loosely with a towel (if you're using a bread machine's dough cycle, let it rise in the machine). Note that sourdough rises more slowly than yeast bread; my starter takes about an hour or so, but some starters take much longer. Let the dough double in bulk, just like yeast-bread dough. When a finger poked into the top of the dough creates a pit that doesn't "heal" (spring back), you've got a risen dough.
Punch the dough down and knead it a little more. Make a loaf and place it on a baking sheet (lightly greased or sprinkled with cornmeal). Slit the top if you like, and cover the loaf with a paper towel and place it in a warm place to rise again, until doubled in bulk.
Place the pan with the loaf in your oven, and then turn your oven to 180o C and bake the bread for 30-45 minutes. Do not preheat the oven. The loaf is done when the crust is brown and the bottom sounds hollow when thumped with a wooden spoon. Turn the loaf out onto a cooling rack or a towel and let it cool for an hour before slicing.